Web API load testing with Visual Studio webtest

This is the first post about load testing with Visual Studio webtest. This series of posts is describing load testing on a Visual Studio Web API.

This first post is about setting up the Visual Studio webtest for the demo Web API project with Visual Studio 2015. We’re using the latest version of the .NET Framework so we can use all the latest cool stuff in our code.

Setup the project

  1. Create a new WebApi project and don’t forget to set the .NET Framework version to 4.6. Remember, I use the new Visual Studio 2015 RTM version.
  2. Create a new class library and call it “Extensions”.
  3. In the Extensions project, add a reference to “Microsoft.VisualStudio.QualityTools.WebTestFramework”. This project is for creating custom extension for Visual Studio webtests.
  4. Add again a new project. Choose a “Web Performance and Load test Project” project. I called mine “WebApiTest”.
  5. Add a reference from the test project to the Extensions project so we can use the extensions in the webtests.

So, the first thing is done. Setting up the project is the easy part. Now comes the testing part.

When you created the test project, a new empty webtest is created. We are now going to change the request so we can test it.

  1. Rename the webtest to ValuesTest because we are going to test the ValuesController of the Web Api project.
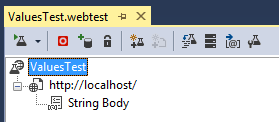
  2. Right click your ValuesTest and add a “Web Service Request”. Change the url to “http://localhost:26159/api/values” (your portnumber can be different).
  3. Change the method from POST to GET.
  4. Run your test and you will get a 401 unauthorized request back.
  5. Remove the Authorize attribute on the ValuesController
  6. Run the webtest again and now you will get a status 200 with as response “Binary Data”. This is off course your JSON response message.

Now we have to validate your response message because we don’t know if your test is sending the correct message.

  1. Right click your web request and select “Add Validation Rule”.
  2. A window appears. Select the “Find text” validation rule.
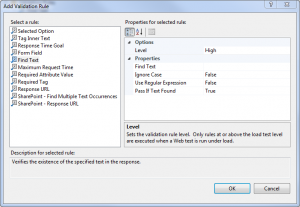
    Webstest add validation rule
  3. Enter in the “Find text” property the value “value3”.
  4. Run your test and your test will fail on the validation rule.
    Find text validation rule value3 failed
  5. Change the “Find text” property to “value2”.
  6. Run the test again and now your test will be valid.
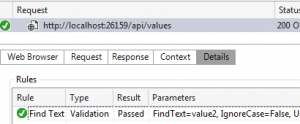
    Find text validation rule value2 passed

Ok. The foundation is done for the testing part. We have a test project and a source project that must be validated. The extensions part isn’t used yet. This will be done in the next part. In that part we are going to create a more detailed ValidationRule that really understand JSON reponses. Then we don’t have to “find text” in the reponse but we can search for a property that we want to validate.

Minification and Bundling in MVC 4 RC

Asp .NET MVC 4 Release Candidate is out. One of the features that is included is called the minification and bundling feature. This was already there in the beta but in the release candidate version it has changed.

Why should we use it

The reason why we should use the bundling and minification feature is performance. The features increases your loading performance of your website. Every time you reference a JavaScript (like jQuery or your own), or CSS file in your page, the browser makes a call to the server. This is done for each separate reference. Each referenced file has included all the comments and spacing in your file. This makes the file larger then when we should delete those spaced. The bundling and minification feature does this for us.

How does it work

In your Global.asax the CSS and JavaScript files are Bundled with BundleConfig.RegisterBundles(BundleTable.Bundles); line.

image

image

Reference the files in your page.

image

When you run the application and use Fiddler to view the calls to your server, you still see all the files called separately.

image

image

This is because the Bundling and Minification feature by default only work when your not in debug mode. This handy because then you could debug with all the whitespaces in your files and have the performance in the production environment.

See the difference in your production environment:

image

image

Force Bundling and Minification

You can use the BundleTable.EnableOptmizations override but the best way for a little test is to remove the debug=”true” attribute in your web.config.

image

Browser caching

When the feature is active, the browser will cache the files. When you add or change some JavaScript or CSS code, the files are generated again and the version number in the references are updated. In that way, the browser knows that there is a new version and your website wont brake.

image

Use .Where().Select().Single() rather than .Single()

When you use the .Single() lambda statement, you will only get one result. When you only use 1 property of the whole object it is totally waste of the performance. Only get want you want. So you could better use the .Select() statement to get only the property you want.

See the difference below where we have an example for getting the profile picture of an unique user.

.Where().Select().Single()

byte[] imageData = Context.Profiles.Where(p => p.Id == profileId).Select(p => p.Picture).Single();

SELECT
[Limit1].[Picture] AS [Picture]
FROM ( SELECT TOP (2)
[Extent1].[Picture] AS [Picture]
FROM [dbo].[Profiles] AS [Extent1]
WHERE [Extent1].[Id] = @p__linq__0
)  AS [Limit1]

.Single()

byte[] imageData = Context.Profiles.Single(p => p.Id == profileId).Picture;

SELECT TOP (2)
[Extent1].[Id] AS [Id],
[Extent1].[FirstName] AS [FirstName],
[Extent1].[LastName] AS [LastName],
[Extent1].[Birthday] AS [Birthday],
[Extent1].[HideBirthdayYear] AS [HideBirthdayYear],
[Extent1].[Picture] AS [Picture],
[Extent1].[ModifiedOn] AS [ModifiedOn],
[Extent1].[UserId] AS [UserId]
FROM [dbo].[Profiles] AS [Extent1]
WHERE [Extent1].[Id] = @p__linq__0


Imagine what the difference would be with nested queries, joins, or even bigger objects (tables) than this example.